Hello everyone, in this tutorial we are going to learn how to make a calculator app for android (using Eclipse). Step by step process is given in this article that will help you to make a simple calculator in very easy way.
You can also download the apk file and use it as a normal app in your android phone.
Steps to Make a Calculator App for Android
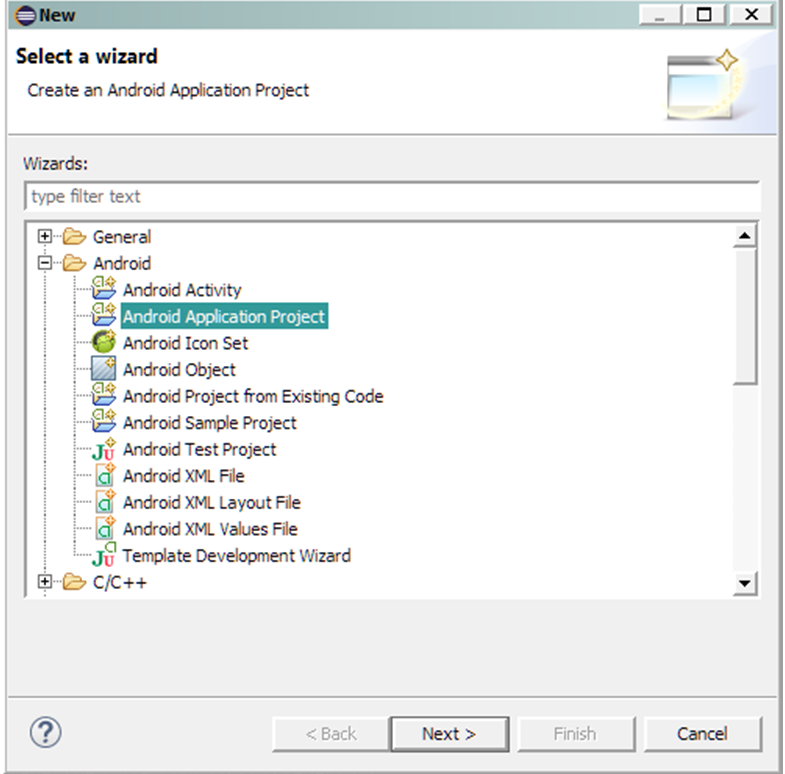
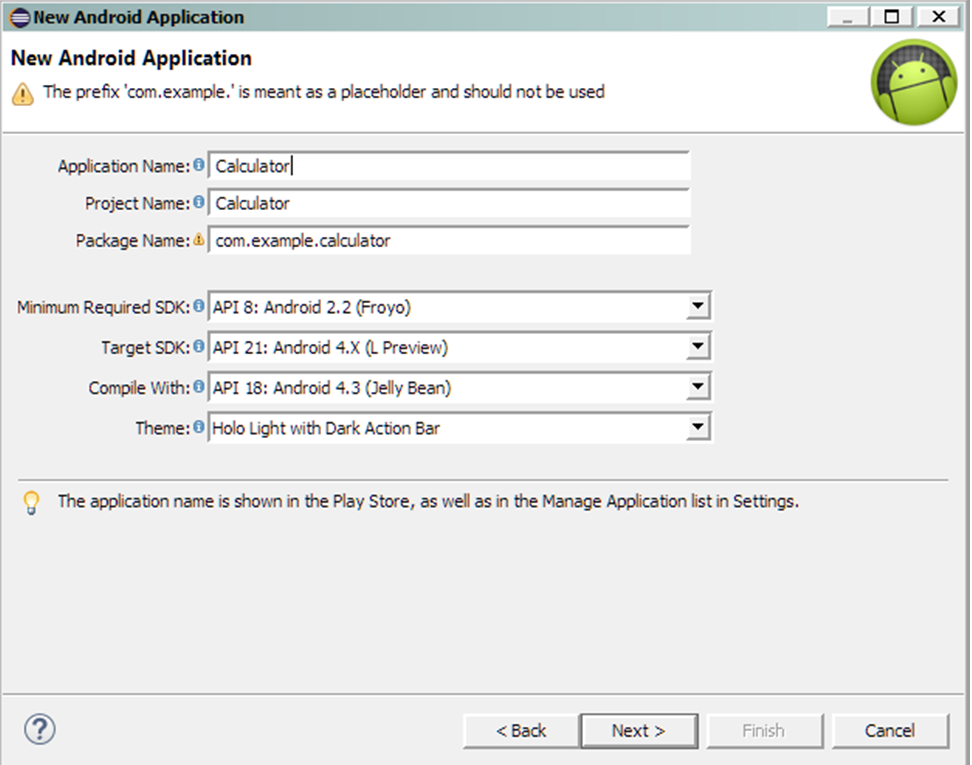
2. Create a new project > Select Android Application Project > Now name your project “Calc”.

4. If you want you can leave it to the default package name which is “com.example.calc”. Now hit next two times.

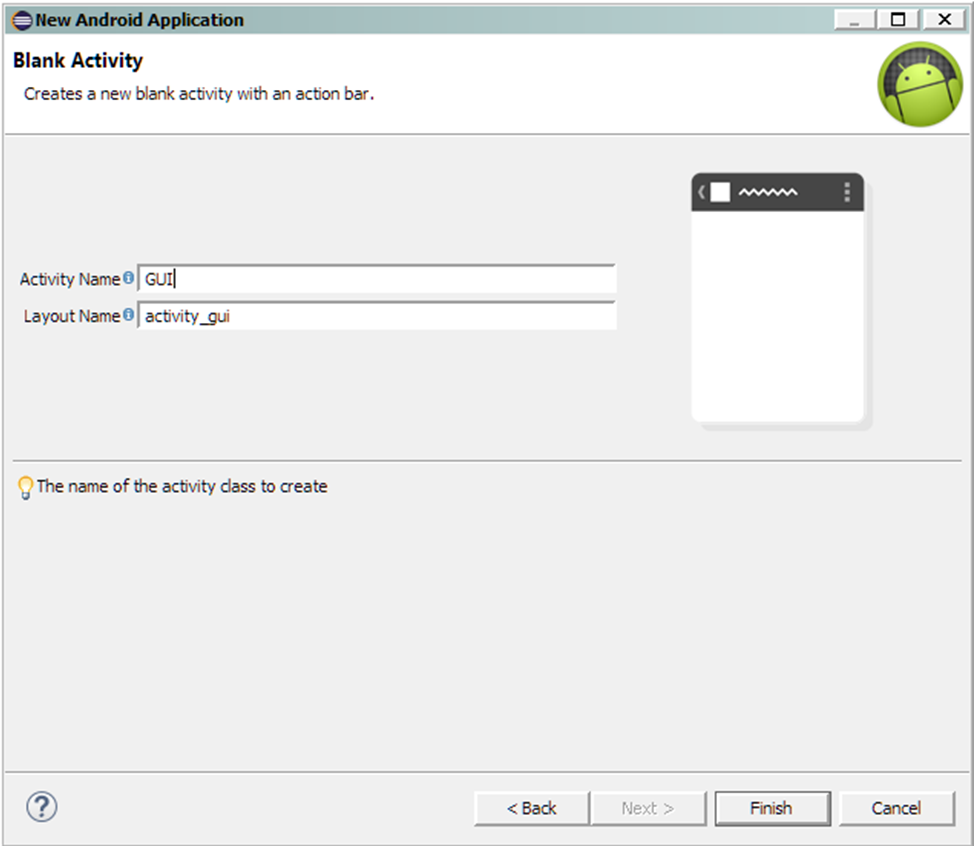
5. If you have made an Icon then add it otherwise go with the default one. Select Blank Activity > Now name your activity “GUI”.

6. From Palette option add total 16 buttons & name them from 0 to 9 and +, -, X, /, ., =.

7. After completing this go to Package Explorer & under your Package Explorer Select src > Your package Name > yourActivityName.java

8. Open the java file and paste the given code:
packagecom.example.calc;

import android.support.v7.app.ActionBarActivity;
importandroid.os.Bundle;
importandroid.view.Menu;
importandroid.view.MenuItem;
importandroid.view.View;
importandroid.widget.Button;
importandroid.widget.EditText;

public class GUI extends ActionBarActivity {
Button b1,b2,b3,b4,b5,b6,b7,b8,b9,b0,bdot,badd,bsub,bmul,bdiv,beq;
EditText et;
int val1,val2;
boolean add,sub,div,mul;
 @Override
 protected void onCreate(Bundle savedInstanceState) {
  super.onCreate(savedInstanceState);
  setContentView(R.layout.activity_gui);
  b1=(Button) findViewById(R.id.button1);
  b2=(Button) findViewById(R.id.Button01);
  b3=(Button) findViewById(R.id.Button02);
  b4=(Button) findViewById(R.id.Button03);
  b5=(Button) findViewById(R.id.Button04);
  b6=(Button) findViewById(R.id.Button05);
  b7=(Button) findViewById(R.id.Button06);
  b8=(Button) findViewById(R.id.Button07);
  b9=(Button) findViewById(R.id.Button08);
  b0=(Button) findViewById(R.id.Button09);
  bdot=(Button) findViewById(R.id.Button10);
  badd=(Button) findViewById(R.id.Button11);
  bsub=(Button) findViewById(R.id.Button12);
  bmul=(Button) findViewById(R.id.Button13);
  bdiv=(Button) findViewById(R.id.Button14);
  beq=(Button) findViewById(R.id.Button15);
  et=(EditText) findViewById(R.id.editText1);

  b1.setOnClickListener(new View.OnClickListener() {
   @Override
   public void onClick(View v) {
    // TODO Auto-generated method stub
    et.setText(et.getText()+"1");
   }
  });
  b2.setOnClickListener(new View.OnClickListener() {
   @Override
   public void onClick(View v) {
    // TODO Auto-generated method stub
    et.setText(et.getText()+"2");
   }
  });
  b3.setOnClickListener(new View.OnClickListener() {
   @Override
   public void onClick(View v) {
    // TODO Auto-generated method stub
    et.setText(et.getText()+"3");
   }
  });
  b4.setOnClickListener(new View.OnClickListener() {
   @Override
   public void onClick(View v) {
    // TODO Auto-generated method stub
    et.setText(et.getText()+"4");
   }
  });
  b5.setOnClickListener(new View.OnClickListener() {
   @Override
   public void onClick(View v) {
    // TODO Auto-generated method stub
    et.setText(et.getText()+"5");
   }
  });
  b6.setOnClickListener(new View.OnClickListener() {
   @Override
   public void onClick(View v) {
    // TODO Auto-generated method stub
    et.setText(et.getText()+"6");
   }
  });
  b7.setOnClickListener(new View.OnClickListener() {
   @Override
   public void onClick(View v) {
    // TODO Auto-generated method stub
    et.setText(et.getText()+"7");
   }
  });
  b8.setOnClickListener(new View.OnClickListener() {
   @Override
   public void onClick(View v) {
    // TODO Auto-generated method stub
    et.setText(et.getText()+"8");
   }
  });
  b9.setOnClickListener(new View.OnClickListener() {
   @Override
   public void onClick(View v) {
    // TODO Auto-generated method stub
    et.setText(et.getText()+"9");
   }
  });
  b0.setOnClickListener(new View.OnClickListener() {
   @Override
   public void onClick(View v) {
    // TODO Auto-generated method stub
    et.setText(et.getText()+"0");
   }
  });
  bdot.setOnClickListener(new View.OnClickListener() {
   @Override
   public void onClick(View v) {
    // TODO Auto-generated method stub
    et.setText(et.getText()+".");
   }
  });

 badd.setOnClickListener(new View.OnClickListener() {

  @Override
  public void onClick(View v) {
   val1=Integer.parseInt(et.getText()+"");
   add=true;
   et.setText(null);
  }
 });
bsub.setOnClickListener(new View.OnClickListener() {

  @Override
  public void onClick(View v) {
   val1=Integer.parseInt(et.getText()+"");
   sub=true;
   et.setText(null);
  }
 });
bdiv.setOnClickListener(new View.OnClickListener() {

 @Override
 public void onClick(View v) {
  val1=Integer.parseInt(et.getText()+"");
  div=true;
  et.setText(null);
 }
});
bmul.setOnClickListener(new View.OnClickListener() {

 @Override
 public void onClick(View v) {
  val1=Integer.parseInt(et.getText()+"");
  mul=true;
  et.setText(null);
 }
});

beq.setOnClickListener(new View.OnClickListener() {

 @Override
 public void onClick(View v) {
  val2=Integer.parseInt(et.getText()+"");
  if (add==true) {
   et.setText(val1+val2+"");
   add=false;
  }
  if (sub==true) {
   et.setText(val1-val2+"");
   sub=false;
  }
  if (mul==true) {
   et.setText(val1*val2+"");
   mul=false;
  }
  if (div==true) {
   et.setText(val1/val2+"");
   div=false;
  }
 }

});


 }

 @Override
 publicbooleanonCreateOptionsMenu(Menu menu) {
  // Inflate the menu; this adds items to the action bar if it is present.
  getMenuInflater().inflate(R.menu.gui, menu);
  return true;
 }

 @Override
 publicbooleanonOptionsItemSelected(MenuItem item) {
  // Handle action bar item clicks here. The action bar will
  // automatically handle clicks on the Home/Up button, so long
  // as you specify a parent activity in AndroidManifest.xml.
  int id = item.getItemId();
  if (id == R.id.action_settings) {
   return true;
  }
  returnsuper.onOptionsItemSelected(item);
 }
}

If you liked the tutorial then don’t forget to comment and share!

Int will store only non decimal values and if you are using divide and . in your calculator you should use double :). Just a view, not saying you have done it wrong.
thanks a lot for your suggestion 🙂
I am a new Android developer I hope it will help me….Thanks in advance
Hello md. imran please help me for android app develope,,
how to start developing,,,
i am presuing BCA
in this time i am learning c.
but i want to know android developing..
Start learning java, atleast clear your basic understanding of programming
Fantastic… simplest ever Calculator code i have ever found on internet… just tell me why are we using this (+ " ") in the getText() thanx…
val1 and val2 are integers, but as u know textbox supports string so to convert integer to string we just add +""
Not only that it will display blank as the string is set null (i.e. ” “), if we insert “+”,”2″ or any digits it will display that.
what if i want to show the operator symbol also
your program is very clear.. but I didnt get the output bcos it gives the result as 0 for all the operator… seems lyk something is missing… clear it plz….
may be the id for each content is not good…or its matchi ng…u should check id of each content either its a button or textfield
app got chrashed during entring value -20 or dividing any value by 0 eg 5/0 . there is no exception handling for this hence a bad code
can you give the example of calculator like windows ,with android code
i followed these steps but answer is nothing…so plz add more step for every step..and check the code…if i have some problems in coding then how to solve this my self?some red signal makes under the code self…how we can removed ….plz help me and all of..
I took 16 buttons and then in my XML file,I assigned 0 to 9 and then +,-,*,/,.,=
but they are not working properly i.e,if I am clicking on 2 button but it is performing different operations
I’m new on Android developer. This code is really helpful for me. Thanks…
This tutorial was very helpful to build my basics. I was able to build my own app for Play store. Thank you Sir.
This tutorial was very helpful to build my basics. I was able to build my own app for Play store. Thank you Sir.
This is great way to start your android programming.But with this code,You can’t use your dot operator and even if you change your operands to Double or Floats then you cannot do more than 1 calculation in the calculator.Example you want to add 12+1 that would give you 13.0 but now if you want to add 1 more to this 13.0 without pressing Clear,the application would crash.
But this crash doesn’t happen when you are using integer types.
hi bro since your code dont follow operator precedence the result is incorrect in calculation of more than two numbers
How to store values when we pressed any button if we want to do multiple operation .
Thanks sir i get some ideas in your code 🙂
thanks I enjoyed the as a new comer
l hope I will get more from you masters
Thanks.
How to add multiple number